• Posted Sep 26• 2024.
There’s no better way to celebrate Halloween than with some delicious and spooky cat-shaped cookies! Spooky & Sweet, these cookies will be adored by everyone. From mysterious black cats to zombie or vampire cats, they’re as fun to make as they are to eat. So get ready to bake and decorate for the spooky season!
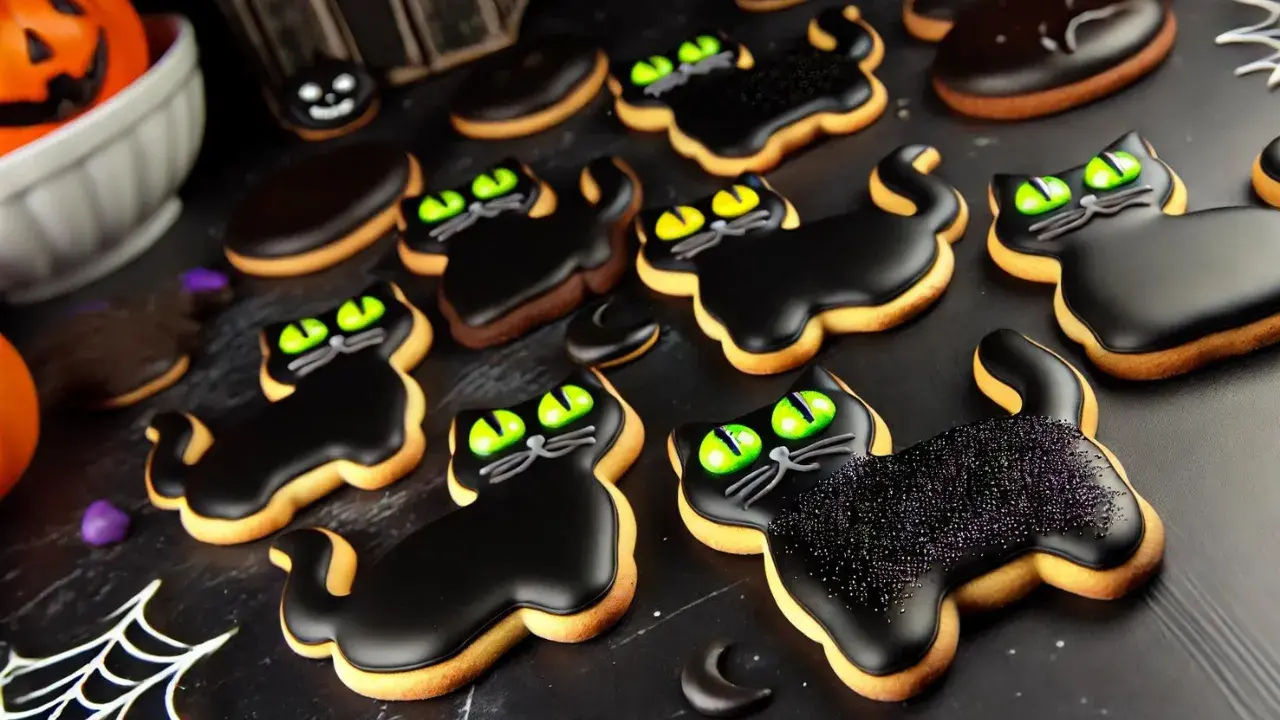
Mysterious Black Cat Cookies
Mysterious Black Cat Cookies
Servings:
24 cookies
Ingredients
- 2 1/2 cups (325 grams) all-purpose flour
- 1/2 cup (50 grams) unsweetened cocoa powder
- 1 teaspoon baking powder
- 1/2 teaspoon salt
- 1 1/2 cups (300 grams) granulated sugar
- 1/2 cup (113 grams) unsalted butter, room temperature
- 2 large eggs
- 1 teaspoon vanilla extract
- Black food coloring
- Candy eyes or colored candies for decorating
- Edible glitter (optional)
Instructions
- Preheat the oven to 350°F (175°C) and line a baking sheet with parchment paper.
- In a large bowl, whisk together the flour, cocoa powder, baking powder, and salt until well combined.
- In another bowl, beat the butter and sugar until creamy and smooth.
- Add the eggs one at a time, beating well after each addition, then stir in the vanilla extract.
- Gradually add the dry ingredients to the wet mixture, mixing at low speed until a smooth dough forms.
- Wrap the dough in plastic wrap and refrigerate for at least 30 minutes to make it easier to handle.
- On a floured surface, roll out the dough to about 1/4 inch (0.6 cm) thickness.
- Use a cat-shaped cookie cutter to cut out the cookies and place them on the prepared baking sheet.
- Bake for 10-12 minutes or until the edges are firm. Allow the cookies to cool on the baking sheet for 5 minutes before transferring them to a wire rack to cool completely.
Decoration
- Make royal icing by mixing 2 cups (240 grams) of powdered sugar, 1 egg white, and 1 teaspoon of lemon juice. Beat until the icing is thick and shiny.
- Add black food coloring to the icing until you reach the desired shade.
- Using a piping bag with a small tip, cover the surface of the cookies with the black icing, leaving spaces for the eyes and other details.
- Place candy eyes or colored candies in the appropriate spaces before the icing dries.
- If desired, sprinkle edible glitter over the cookies for a magical, shiny effect.
Pumpkin Cat

Pumpkin Cat
You might also be interested in:
Servings:
24 cookies
Ingredients
- 2 1/2 cups (315 grams) all-purpose flour
- 1/2 teaspoon baking powder
- 1/4 teaspoon salt
- 3/4 cup (170 grams) unsalted butter, room temperature
- 1 cup (200 grams) granulated sugar
- 1 large egg
- 1 teaspoon vanilla extract
- Orange food coloring
- Black food coloring
- 2 cups (240 grams) powdered sugar
- 2 tablespoons (30 ml) lemon juice
- 1 egg white
Instructions
- Preheat the oven to 350°F (175°C) and line a baking sheet with parchment paper.
- In a medium bowl, whisk together the flour, baking powder, and salt. Set aside.
- In a large bowl, beat the butter and sugar until light and fluffy.
- Add the egg and vanilla, beating until well combined.
- Gradually add the dry ingredients to the wet mixture, beating at low speed until a dough forms.
- Wrap the dough in plastic wrap and refrigerate for 30 minutes to make it easier to handle.
- Roll out the dough on a lightly floured surface to about 1/4 inch (0.6 cm) thickness.
- Use cat-shaped cookie cutters to cut out the cookies and place them on the prepared baking sheet.
- Bake for 10-12 minutes, until the edges are firm. Let the cookies cool on the baking sheet for 5 minutes before transferring them to a wire rack to cool completely.
Decoration
- Make royal icing by mixing the powdered sugar, egg white, and lemon juice. Beat until the mixture is thick and glossy.
- Divide the icing into two parts. Add orange food coloring to one half and black food coloring to the other.
- Use the orange icing to cover the entire body of the cookies, simulating a cat dressed as a pumpkin.
- With a piping bag and the black icing, add details like the eyes, nose, and whiskers.
- Allow the decorated cookies to dry completely before serving.
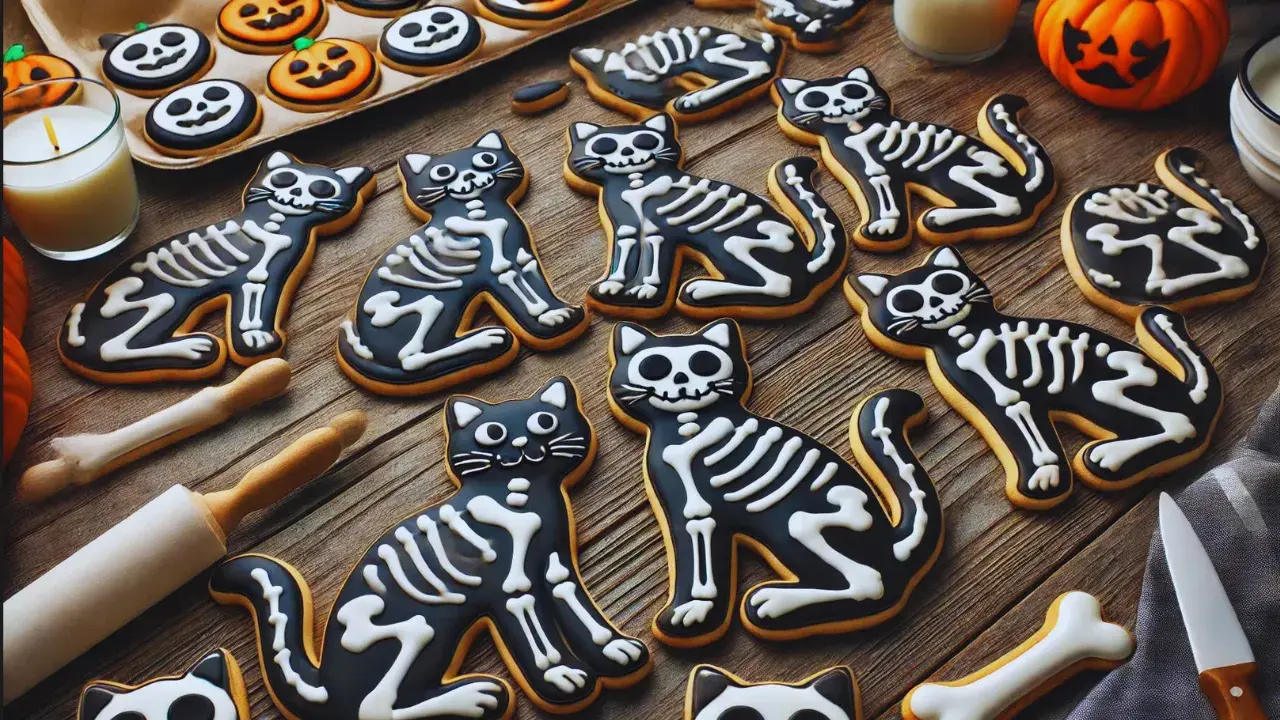
Skeleton Cat
Skeleton Cat
Servings:
24 cookies
Ingredients
- 2 1/2 cups (315 grams) all-purpose flour
- 1/2 cup (50 grams) unsweetened cocoa powder
- 1/2 teaspoon baking powder
- 1/4 teaspoon salt
- 3/4 cup (170 grams) unsalted butter, room temperature
- 1 cup (200 grams) granulated sugar
- 1 large egg
- 1 teaspoon vanilla extract
- Black food coloring
- White food coloring
- 2 cups (240 grams) powdered sugar
- 2 tablespoons (30 ml) lemon juice
- 1 egg white
Instructions
- Preheat the oven to 350°F (175°C) and line a baking sheet with parchment paper.
- In a medium bowl, whisk together the flour, cocoa powder, baking powder, and salt. Set aside.
- In a large bowl, beat the butter and sugar until light and fluffy.
- Add the egg and vanilla extract, beating until well combined.
- Gradually add the dry ingredients to the wet mixture, mixing at low speed until a smooth dough forms.
- Wrap the dough in plastic wrap and refrigerate for 30 minutes to make it easier to handle.
- Roll out the dough on a lightly floured surface to about 1/4 inch (0.6 cm) thickness.
- Use a cat-shaped cookie cutter to cut out the cookies and place them on the prepared baking sheet.
- Bake the cookies for 10-12 minutes, or until the edges are firm. Let the cookies cool on the baking sheet for 5 minutes before transferring them to a wire rack to cool completely.
Decoration
- Make royal icing by mixing the powdered sugar, egg white, and lemon juice. Beat until thick and shiny.
- Divide the icing into two parts. Add black food coloring to one half and leave the other half white.
- Use the black icing to cover the surface of the cookies, creating a dark base.
- With a piping bag and the white icing, draw the ribs, spine, and bones on the cat-shaped skeleton cookies.
- Let the cookies dry completely before serving.
Vampire Cat

Vampire Cat
Servings:
24 cookies
Ingredients
- 2 1/2 cups (315 grams) all-purpose flour
- 1/2 teaspoon baking powder
- 1/4 teaspoon salt
- 3/4 cup (170 grams) unsalted butter, room temperature
- 1 cup (200 grams) granulated sugar
- 1 large egg
- 1 teaspoon vanilla extract
- Black food coloring
- Red food coloring
- 2 cups (240 grams) powdered sugar
- 2 tablespoons (30 ml) lemon juice
- 1 egg white
- Red candy eyes or bright candies
Instructions
- Preheat the oven to 350°F (175°C) and line a baking sheet with parchment paper.
- In a medium bowl, whisk together the flour, baking powder, and salt. Set aside.
- In a large bowl, beat the butter and sugar until light and fluffy.
- Add the egg and vanilla, beating until well combined.
- Gradually add the dry ingredients to the wet mixture, mixing at low speed until a dough forms.
- Wrap the dough in plastic wrap and refrigerate for 30 minutes to make it easier to handle.
- Roll out the dough on a lightly floured surface to about 1/4 inch (0.6 cm) thickness.
- Use a cat-shaped cookie cutter to cut out the cookies and place them on the prepared baking sheet.
- Bake for 10-12 minutes, or until the edges are firm. Let the cookies cool on the baking sheet for 5 minutes before transferring them to a wire rack to cool completely.
Decoration
- Make royal icing by mixing the powdered sugar, egg white, and lemon juice. Beat until thick and shiny.
- Divide the icing into three parts. Color one black, one red, and leave the third white.
- Use the black icing to cover the cat’s body, creating a dark and sinister base.
- With the white icing, draw sharp fangs in the cat’s mouth.
- Place red candy eyes or bright candies to give the cat a more malevolent look.
- Use the red icing to draw a small cape on the back of the cat, simulating a vampire’s attire.
- Let the cookies dry completely before serving.
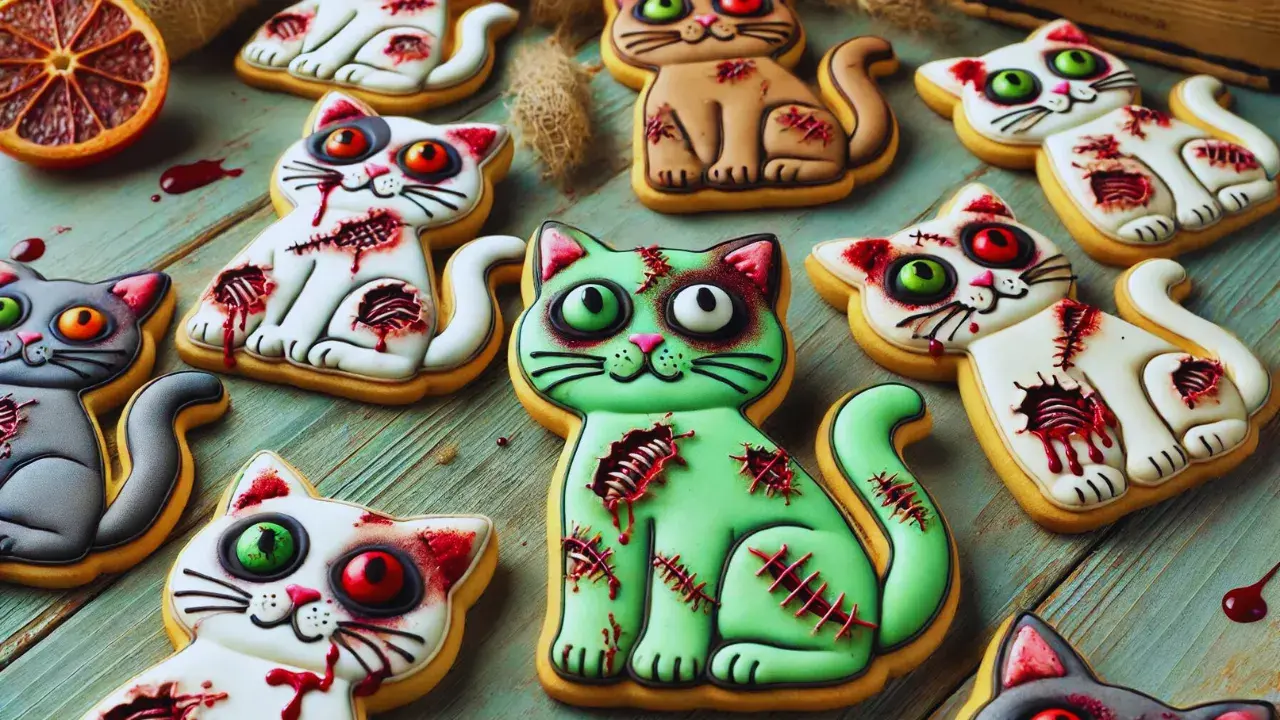
Zombie Cat Cookies
Zombie Cat Cookies
Servings:
24 cookies
Ingredients
- 2 1/2 cups (315 grams) all-purpose flour
- 1/2 teaspoon baking powder
- 1/4 teaspoon salt
- 3/4 cup (170 grams) unsalted butter, room temperature
- 1 cup (200 grams) granulated sugar
- 1 large egg
- 1 teaspoon vanilla extract
- Pale green or gray food coloring
- Red or brown food coloring
- 2 cups (240 grams) powdered sugar
- 2 tablespoons (30 ml) lemon juice
- 1 egg white
- Candy eyes or mismatched candy for decoration
Instructions
- Preheat the oven to 350°F (175°C) and line a baking sheet with parchment paper.
- In a medium bowl, whisk together the flour, baking powder, and salt. Set aside.
- In a large bowl, beat the butter and sugar until light and fluffy.
- Add the egg and vanilla extract, beating until well combined.
- Gradually add the dry ingredients to the wet mixture, mixing at low speed until a smooth dough forms.
- Wrap the dough in plastic wrap and refrigerate for 30 minutes to make it easier to handle.
- Roll out the dough on a lightly floured surface to about 1/4 inch (0.6 cm) thickness.
- Use a cat-shaped cookie cutter to cut out the cookies and place them on the prepared baking sheet.
- Bake for 10-12 minutes, or until the edges are firm. Let the cookies cool on the baking sheet for 5 minutes before transferring them to a wire rack to cool completely.
Decoration
- Make royal icing by mixing the powdered sugar, egg white, and lemon juice. Beat until thick and shiny.
- Divide the icing into three parts. Color one part pale green or gray for the cat’s body, another part red or brown for the scars, and leave the last part white for additional details.
- Use the green or gray icing to cover the cat’s body, simulating a zombie’s worn-out look.
- Draw scars and stitches on the body with the red or brown icing, and add mismatched or misaligned eyes for a creepy effect.
- Use other icing colors to add bloody or torn details on the cat’s body.
- Let the cookies dry completely before serving.
Ghost Cat Cookies

Ghost Cat Cookies
Servings:
24 cookies
Ingredients
- 2 1/2 cups (315 grams) all-purpose flour
- 1/2 teaspoon baking powder
- 1/4 teaspoon salt
- 3/4 cup (170 grams) unsalted butter, room temperature
- 1 cup (200 grams) granulated sugar
- 1 large egg
- 1 teaspoon vanilla extract
- White food coloring
- Black food coloring
- 2 cups (240 grams) powdered sugar
- 2 tablespoons (30 ml) lemon juice
- 1 egg white
- Edible glitter (optional)
Instructions
- Preheat the oven to 350°F (175°C) and line a baking sheet with parchment paper.
- In a medium bowl, whisk together the flour, baking powder, and salt. Set aside.
- In a large bowl, beat the butter and sugar until light and fluffy.
- Add the egg and vanilla extract, beating until well combined.
- Gradually add the dry ingredients to the wet mixture, mixing at low speed until a smooth dough forms.
- Wrap the dough in plastic wrap and refrigerate for 30 minutes to make it easier to handle.
- Roll out the dough on a lightly floured surface to about 1/4 inch (0.6 cm) thickness.
- Use a cat-shaped cookie cutter to cut out the cookies and place them on the prepared baking sheet.
- Bake for 10-12 minutes, or until the edges are firm. Let the cookies cool on the baking sheet for 5 minutes before transferring them to a wire rack to cool completely.
Decoration
- Make royal icing by mixing the powdered sugar, egg white, and lemon juice. Beat until thick and shiny.
- Add white food coloring to the icing to cover the body of the cookies, giving them a ghostly appearance.
- With a piping bag and black icing, draw the eyes and nose to give them a mysterious look.
- Use the white icing to draw a small flowing ghostly cape from the cat’s body, creating an ethereal effect.
- If desired, sprinkle edible glitter for a spectral shimmer, as if the cat is floating in the darkness.
- Let the cookies dry completely before serving.
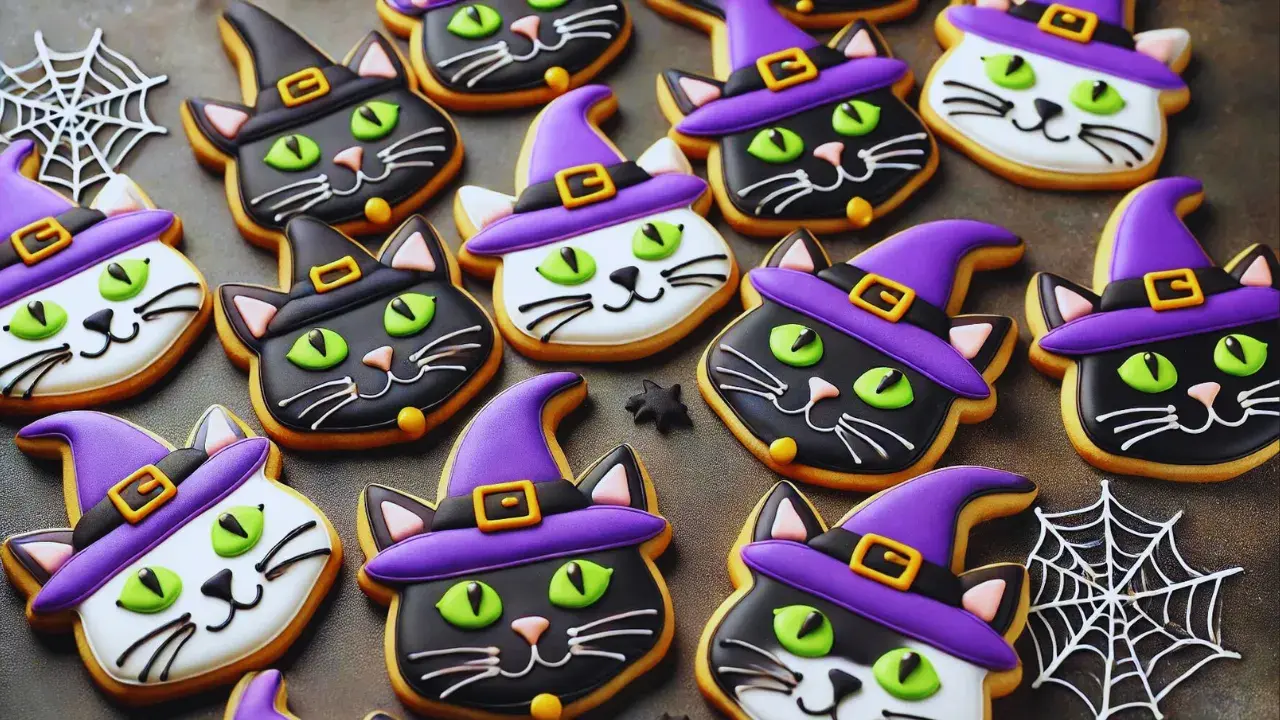
Witch Cat Cookies
Witch Cat Cookies
Servings:
24 cookies
Ingredients
- 2 1/2 cups (315 grams) all-purpose flour
- 1/2 teaspoon baking powder
- 1/4 teaspoon salt
- 3/4 cup (170 grams) unsalted butter, room temperature
- 1 cup (200 grams) granulated sugar
- 1 large egg
- 1 teaspoon vanilla extract
- Purple or black food coloring for the hat
- Green food coloring for the eyes
- White or black food coloring for the whiskers
- Gold food coloring for the hat buckle
- 2 cups (240 grams) powdered sugar
- 2 tablespoons (30 ml) lemon juice
- 1 egg white
Instructions
- Preheat the oven to 350°F (175°C) and line a baking sheet with parchment paper.
- In a medium bowl, whisk together the flour, baking powder, and salt. Set aside.
- In a large bowl, beat the butter and sugar until light and fluffy.
- Add the egg and vanilla, beating until well combined.
- Gradually add the dry ingredients to the wet mixture, mixing at low speed until a smooth dough forms.
- Wrap the dough in plastic wrap and refrigerate for 30 minutes to make it easier to handle.
- Roll out the dough on a lightly floured surface to about 1/4 inch (0.6 cm) thickness.
- Use a cat-shaped cookie cutter to cut out the cookies and place them on the prepared baking sheet.
- Bake for 10-12 minutes, or until the edges are firm. Let the cookies cool on the baking sheet for 5 minutes before transferring them to a wire rack to cool completely.
Decoration
- Make royal icing by mixing the powdered sugar, egg white, and lemon juice. Beat until thick and shiny.
- Divide the icing into several parts. Color one part purple or black for the hat, another part green for the eyes, and leave one part white or black for the whiskers. Use the gold coloring for the hat buckle.
- Use the purple or black icing to draw the hat on the cat’s head.
- With a piping bag, add a small golden buckle to the hat for a charming detail.
- Draw the cat’s eyes with bright green icing to make them stand out.
- Use white or black icing to create the whiskers, adding the final touch to your design.
- Let the cookies dry completely before serving.
Sugar Skull Cat Cookies
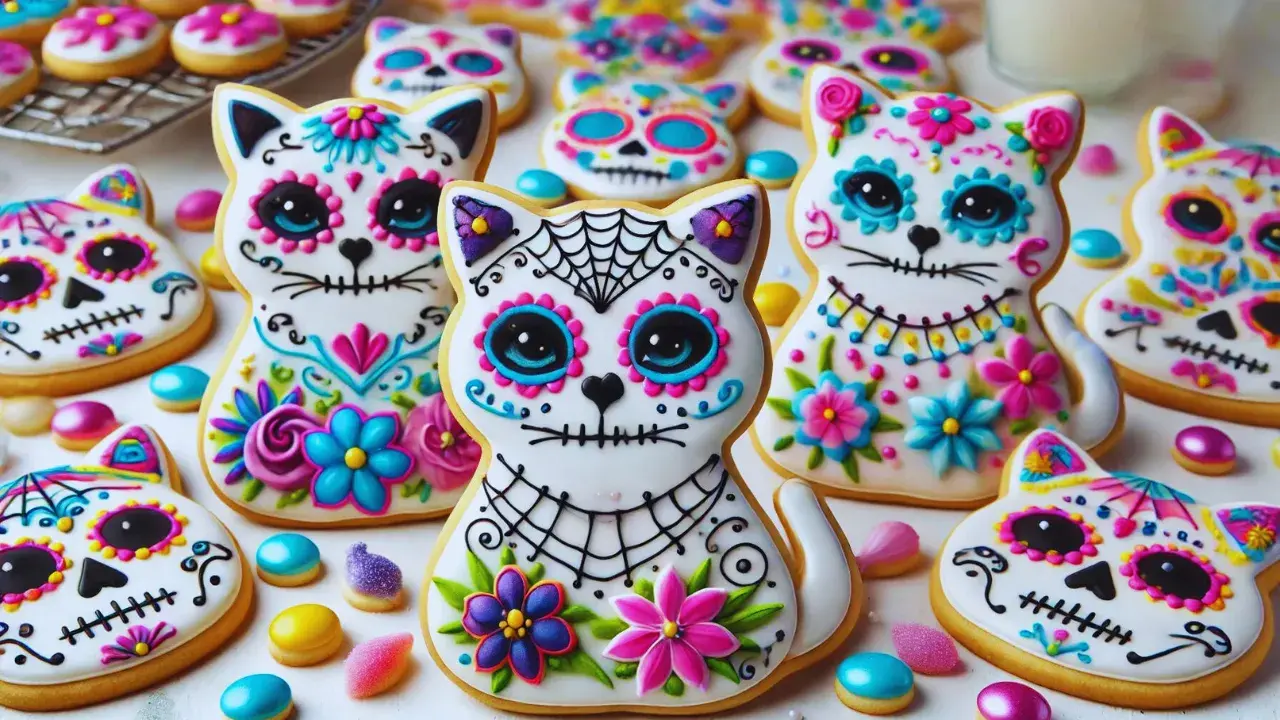
Sugar Skull Cat Cookies
Servings:
24 cookies
Ingredients
- 2 1/2 cups (315 grams) all-purpose flour
- 1/2 teaspoon baking powder
- 1/4 teaspoon salt
- 3/4 cup (170 grams) unsalted butter, room temperature
- 1 cup (200 grams) granulated sugar
- 1 large egg
- 1 teaspoon vanilla extract
- Food coloring in vibrant colors like pink, blue, green, and yellow
- Black food coloring
- 2 cups (240 grams) powdered sugar
- 2 tablespoons (30 ml) lemon juice
- 1 egg white
- Small candies or edible pearls for decoration (optional)
Instructions
- Preheat the oven to 350°F (175°C) and line a baking sheet with parchment paper.
- In a medium bowl, whisk together the flour, baking powder, and salt. Set aside.
- In a large bowl, beat the butter and sugar until light and fluffy.
- Add the egg and vanilla extract, and continue beating until well combined.
- Gradually add the dry ingredients to the wet mixture, mixing at low speed until a smooth dough forms.
- Wrap the dough in plastic wrap and refrigerate for 30 minutes to make it easier to handle.
- Roll out the dough on a lightly floured surface to about 1/4 inch (0.6 cm) thickness.
- Use a cat-shaped cookie cutter to cut out the cookies and place them on the prepared baking sheet.
- Bake for 10-12 minutes, or until the edges are firm. Let the cookies cool on the baking sheet for 5 minutes before transferring them to a wire rack to cool completely.
Decoration
- Make royal icing by mixing the powdered sugar, egg white, and lemon juice. Beat until thick and shiny.
- Color a portion of the icing white and use it as a base to cover the body of the cookies.
- Divide the remaining icing into several parts and add pink, blue, green, and yellow food coloring to each portion to create the vibrant patterns of a sugar skull.
- Use these colors to draw flowers, spirals, and other designs typical of sugar skulls on the cat's body.
- With black icing, draw the eyes and mouth for contrast.
- If desired, add small candies or edible pearls to make the cookies even more festive.
- Let the cookies dry completely before serving.
Well, these are our suggestions for this spooky season. They are fun, spooky, and above all, delicious cookies, all related to the theme we love the most: those precious, furry, mysterious, but always full of love—cats. We love them a lot here, and I think it shows, right?
You might also be interested in: